
Key Takeaways
- Asphalt shingle installation is a precise, multi-step process — cutting corners at any stage compromises the entire system
- Savannah's high-wind zone requires enhanced fastening patterns (6 nails per shingle) and specific underlayment applications
- Proper installation accounts for 60–70% of a roof's actual performance and longevity — material quality alone isn't enough
- Complete tear-off to bare decking is strongly recommended in Savannah to inspect for hidden moisture damage
- Understanding the installation process helps you evaluate contractor quality and hold your roofer accountable
Why Installation Quality Matters More Than Shingle Brand
Homeowners spend significant time researching shingle brands, comparing warranty terms, and debating colors. While material selection matters, the reality is that installation quality has a greater impact on roof performance than the shingle sitting in the package. A premium shingle installed poorly will fail before a mid-grade shingle installed correctly. This is especially true in Savannah's demanding climate, where wind, heat, and moisture constantly test every fastener, overlap, and seal.
Understanding each step of the installation process empowers you to evaluate contractors, ask informed questions, and recognize quality work — or the absence of it.
Step 1: Tear-Off and Deck Inspection
Every quality installation in Savannah starts with removing the existing roofing material down to bare decking. While code permits one overlay layer, professional roofers in coastal Georgia strongly recommend complete tear-off for critical reasons:
- Exposes decking for inspection — moisture damage and rot are common in Savannah's humid climate and are invisible beneath existing shingles
- Allows proper installation of underlayment flat against the deck, without bridging over old shingle edges
- Eliminates trapped moisture between layers that accelerates new shingle deterioration
- Provides a flat, even substrate for the new shingles to lie properly
Any damaged decking sections are replaced at this stage. In Savannah, it's common to find localized decking damage around penetrations (vents, pipes, chimney), in valleys, and along eave edges where moisture exposure is highest.
Step 2: Drip Edge Installation
Metal drip edge is installed along the eaves (bottom edge) and rakes (side edges) of the roof. This component directs water into the gutter system and prevents wind-driven rain from wicking beneath the roofing at the edges. In Savannah's high-wind zone, drip edge is code-required and must be properly fastened to resist uplift forces.
At the eaves, drip edge is installed beneath the underlayment. At the rakes, it's installed over the underlayment. This sequencing ensures water always flows outward at every edge.
Step 3: Underlayment Application
Underlayment is the secondary waterproof barrier between the shingles and the decking. For Savannah installations, the typical system includes:
- Ice and water shield: Self-adhering rubberized membrane applied at eaves (minimum 24 inches past the interior wall line), in all valleys, around all penetrations, and along rake edges. Despite its name, this product is critical in Savannah not for ice protection but for wind-driven rain defense.
- Synthetic underlayment: Applied over the remaining roof surface, overlapping the ice-and-water shield. Synthetic underlayment is strongly preferred over traditional felt paper in Savannah — it's lighter, lies flatter, resists tearing during installation, and won't absorb moisture if exposed to rain during the project.
Step 4: Valley Treatment
Roof valleys — where two roof planes meet — channel concentrated water flow and are the highest-leak-risk areas on any roof. In Savannah's heavy rainfall environment, valleys require premium treatment:
- Open valleys: Metal valley flashing (typically aluminum or galvanized steel) is installed over ice-and-water shield. Shingles are trimmed to expose the metal center channel. This method handles high water volume best and is preferred for Savannah's intense rainfall rates.
- Closed-cut valleys: One plane's shingles cross the full valley while the opposing plane's shingles are cut along a chalk line. Faster to install but can trap debris in the valley crease.
Step 5: Starter Strip
The starter strip is a specialized shingle course installed along the eaves and rakes before the first visible row. Its adhesive strip seals the bottom edge of the first course of field shingles, preventing wind uplift at the most vulnerable roof edge. In Savannah's wind zone, factory-made starter strips with high-wind adhesive are specified rather than improvised cut-shingle starters.
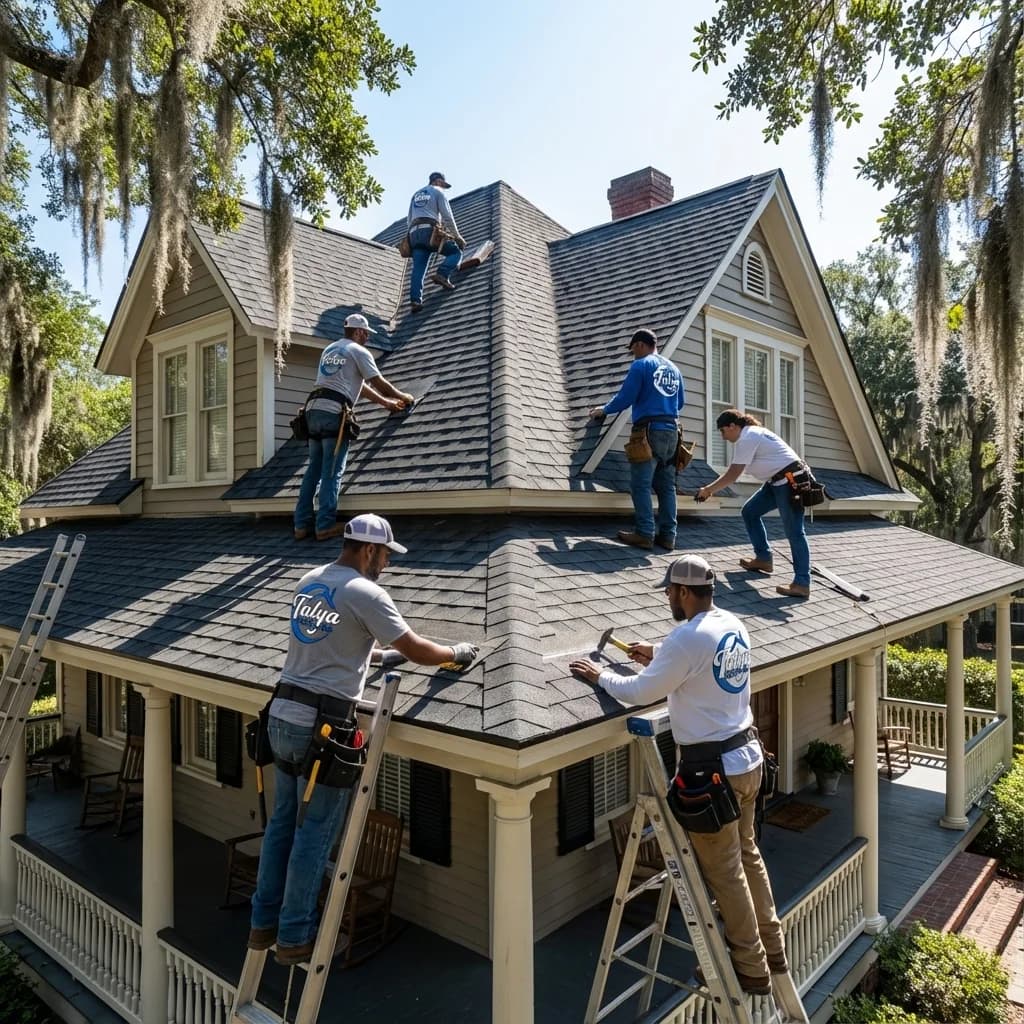
Step 6: Field Shingle Installation
This is where the visible roof surface takes shape. Correct field shingle installation involves strict attention to several technical requirements:
- Nail placement: Nails must hit the manufacturer's specified nailing zone — typically just above the adhesive strip. High nailing (nails placed too high) is the most common installation defect and causes premature shingle blow-off.
- Nail count: Savannah's high-wind zone requires 6 nails per standard shingle vs. the 4-nail pattern used in non-coastal areas. This is a code requirement, not optional.
- Nail depth: The nail head should sit flush with the shingle surface — not overdriven (which cuts the mat) or underdriven (which creates a bump under the overlapping shingle).
- Offset pattern: Each successive course must be offset from the one below to stagger the vertical joints. The specific offset depends on the shingle profile but is never less than 4 inches.
- Exposure: The amount of shingle visible below the overlapping course above. Each manufacturer specifies the exact exposure for their product — typically 5" to 5-5/8" for standard architectural shingles.
Step 7: Flashing and Penetrations
Every point where something penetrates the roof surface — vent pipes, bathroom exhaust fans, kitchen vents, chimneys, skylights, and satellite mounts — requires waterproof flashing. In Savannah, proper flashing is the difference between a roof that leaks and one that doesn't. Each penetration type has a specific flashing methodology:
- Pipe boots: Rubber or metal-and-rubber hybrid flanges that seal around plumbing vent pipes
- Step and counter-flashing: Multi-piece systems at chimneys and wall junctions
- Pre-manufactured vent flashings: Matched to the specific vent model for watertight seal
Step 8: Ridge Cap and Ventilation
The ridge — the peak where two roof planes meet — is capped with specially designed ridge cap shingles that cover the gap and provide the finished look. In Savannah, ridge cap serves a dual purpose: it waterproofs the ridge joint and, when used with ridge vent, provides the exhaust component of the attic ventilation system.
Ridge vent is cut into the decking along the full length of the peak, covered with a breathable vent strip, and sealed with ridge cap shingles over the top. This creates continuous exhaust ventilation that works with soffit intake vents to maintain healthy attic conditions.
Step 9: Cleanup and Final Inspection
Professional installation includes thorough cleanup — magnetic nail sweeps of the yard and driveway, debris removal, and a final walk-through with the homeowner. Your contractor should schedule the required building inspection and provide you with warranty documentation for both materials and workmanship.
Expert Asphalt Shingle Installation in Savannah
Talya Roofing delivers meticulous asphalt shingle installations throughout Savannah, Pooler, Richmond Hill, and Tybee Island. Every project follows manufacturer specifications and exceeds local code requirements for our high-wind coastal zone. Get a detailed proposal for your roof replacement.