
A "lifted" or "curling" shingle edge might not seem like an immediate catastrophe compared to a gaping hole in your roof. However, in Coastal Georgia, lifted shingles act like wind-sails. The next high-velocity squall coming off the Wilmington River will catch that lifted edge, violently tear the shingle back, and expose the vulnerable underlayment beneath.
Diagnosing and fixing lifted shingle edges quickly is one of the most effective ways to prolong the life of your roof. Here is Talya Roofing's guide to addressing this common Savannah roofing issue.
🔍 Why Do Shingles Lift in Savannah?
- ✓ Thermal Shock: The intense swing between 100°F baked afternoons and sudden 60°F thunderstorms causes rapid expansion and contraction.
- ✓ Improper Nailing: If a previous contractor nailed too high on the shingle (missing the nail zone), the bottom edge won't seal correctly.
- ✓ Attic Heat Blistering: Poor attic ventilation essentially "cooks" the shingles from underneath, causing the edges to curl upward.
- ✓ Age: Over a 15-20 year lifespan, volatile asphalt oils dry out, causing shingles to warp naturally.
How to Safely Fix a Lifted Edge (The DIY Approach)
If you only have one or two lightly lifted shingles, sealing them back down is a manageable weekend project.
What You Need:
- A standard caulking gun.
- A tube of wet/dry Asphalt Plastic Roofing Cement (Polyurethane roof sealants also work well).
- A putty knife or flat trowel.
- A heavy brick or sandbag (wrapped in a towel).
The 4-Step Sealing Process:
- Clean the Area: Gently lift the curling shingle (do not force it, or it will snap). Use a small brush to sweep out any pine needles, dirt, or loose granules from underneath. A clean surface is mandatory for the adhesive to bond.
- Apply the Cement: Using your caulking gun, apply three quarter-sized dabs of roofing cement underneath the shingle tab. Stay exactly one inch away from the bottom edge so the cement doesn't squeeze out visibly when pressed.
- Press and Hold: Press the shingle down firmly. If the shingle is stiff, you may need to apply sustained weight. Wrap a brick or a heavy paver in an old towel (so as not to crush the protective granules) and let it rest on the shingle for 24 hours.
- Clean Up: If any black tar oozes out the front edge, immediately scrape it off with an old putty knife. Tar left exposed to UV light will break down rapidly.
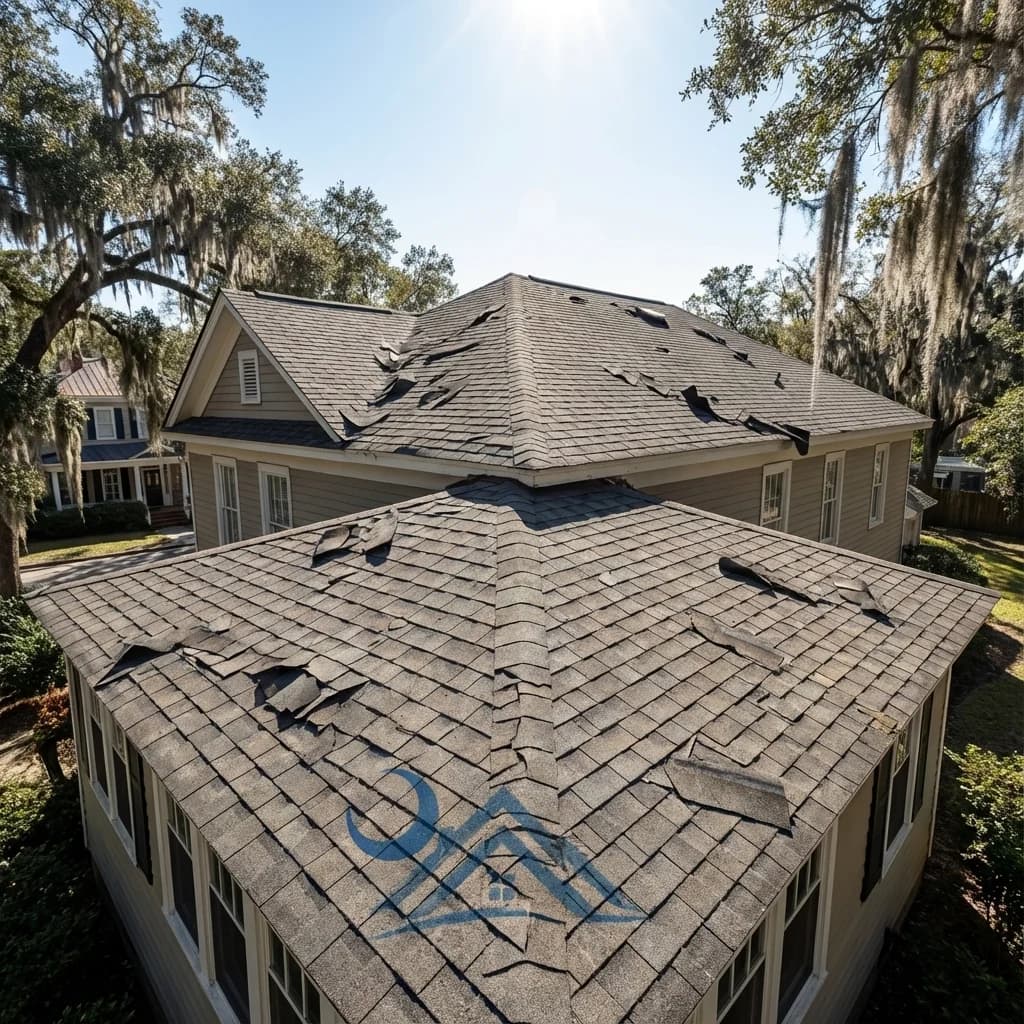
When Curling Means It's Game Over
It is vital to understand the difference between an isolated lifted shingle and systemic failure. If you stand in your driveway and notice that dozens of shingles match the description of "potato-chipping" or curling inward at the edges across the entire slope, do not get on the roof with a tube of caulk.
Widespread curling means the asphalt has completely dried out. The shingles are now incredibly brittle. Just walking on them to attempt a repair will crack them like stepping on dry autumn leaves. This is a definitive sign that your property requires an immediate roof replacement before the next coastal storm season.
| Symptom | Likely Cause | Recommended Action |
|---|---|---|
| 1-3 Shingles lifting slightly | Failed factory sealant / high nails | Spot repair with roofing cement. |
| Curling across whole sections | Severe age / UV oil depletion | Full roof replacement required. |
| Cupping in the middle of shingle | Attic ventilation failure (baking) | Replace roof + upgrade ridge vents. |
Frequently Asked Questions
Can I use regular exterior silicone caulk?
No. Standard silicone and acrylic caulks break down quickly under intense UV exposure and do not bond properly with asphalt. You must use specialized asphalt plastic cement or polyurethane roofing sealants.
Will my insurance cover lifted shingles?
If the lifting was caused by a specific, recent windstorm (like a named hurricane triggering uplift), it may be covered under a roof insurance claim. However, if the lifting is due to age or poor installation, insurance will classify it as "wear and tear" and deny the claim.
Understanding Why Shingles Lift in Savannah
Lifted shingle edges are one of the most common DIY-addressable roof issues in the Savannah area. The primary cause is adhesive strip failure — the thermoplastic seal between shingle layers that activates during the first warm season after installation. In Savannah's climate, this adhesive is stressed by thermal cycling (daily temperature swings of 30-40°F), UV degradation, and wind vibration during storms.
Risk Assessment Before DIY
| Condition | DIY Safe? | What to Do |
|---|---|---|
| 1-3 lifted edges, low pitch (4:12) | Yes | Apply roofing cement under edges, press down firmly |
| Multiple lifted edges, one slope | Caution | May indicate systemic adhesive failure — get inspection first |
| Lifted edges with granule loss | No | Shingles need replacement, not re-adhesion |
| Lifted edges on steep slope (8:12+) | No | Safety risk — hire a professional |
Materials and Tools Needed
For a proper DIY shingle edge repair in Savannah, you'll need: roofing cement (NP-1 or equivalent polyurethane sealant — not silicone, which doesn't adhere to asphalt), a caulking gun, a flat pry bar for gently lifting without cracking, a heat gun or hair dryer to soften cold shingles (essential for winter repairs), and 2-3 roofing nails per shingle tab if the original nails have pulled through. Work on a warm day (above 60°F) when the shingles are pliable — attempting this repair on a cold morning risks cracking the shingle you're trying to save.
When DIY Is NOT Enough
Sealing down one or two lifted shingle edges is a reasonable DIY project. But certain signs indicate that the problem is beyond a tube of roofing cement — and attempting further DIY work risks making things worse or missing a bigger issue:
- Multiple lifted shingles across a wide area: If you count more than 5–6 lifted edges on a single roof slope, the problem is systemic — not isolated. Widespread adhesive failure typically means the shingles have aged past the point where re-sealing provides lasting benefit. The asphalt has dried out, and the factory seal strip has permanently failed. Each shingle you glue down today will lift again within months because the underlying material has lost its flexibility.
- Underlayment is visible: When you lift a shingle edge and can see the black or gray synthetic underlayment (or worse, the bare wood decking) beneath it, the shingle has pulled far enough to expose the waterproofing layer. This means water has likely been reaching the underlayment during wind-driven rain. If the underlayment shows any signs of deterioration — cracking, tearing, or water staining — professional roof repair is needed, not just re-adhesion of the shingle above it.
- Shingles crack when you try to press them down: A healthy shingle is pliable enough to bend slightly when you press it flat. If the shingle cracks, splits, or fragments when you apply gentle pressure, the asphalt has completely dried out. Gluing a cracked shingle creates a false seal — water will penetrate through the crack itself even if the edge is sealed. These shingles need replacement, not repair.
- Decking damage beneath the lifted area: If you can feel soft spots, see dark staining, or notice that the decking flexes when you press on it through the shingle opening, moisture has already compromised the roof structure. Re-sealing the shingle traps moisture against damaged wood and accelerates rot. The decking needs to be assessed and potentially replaced before new shingles go on.
- The problem keeps recurring: If you sealed shingle edges last year and they have lifted again, the repair is not holding because the underlying cause has not been addressed. Common underlying causes include inadequate attic ventilation (cooking the shingles from below), improper original nail placement, or shingles that have simply reached end-of-life.
Cost of Professional Shingle Repair
Understanding what professional repair costs helps you compare the value of DIY effort against hiring a qualified roofer:
- Spot re-adhesion (1–10 shingles): $150–$350 for a service call including labor and materials. Most Savannah roofers charge a minimum service call fee of $150–$200, which covers the first several shingles. This includes proper cleaning, commercial-grade adhesive, and verification that the surrounding shingles are still sound.
- Shingle replacement (individual shingles): $200–$500 for replacing 5–15 damaged shingles, including matching the existing shingle profile and color as closely as possible. Replacement is the better choice when the shingles have cracked, lost significant granules, or show signs of advanced deterioration beyond simple edge lifting.
- Section repair (one roof slope): $500–$1,500 for re-shingling a section where widespread lifting indicates localized failure. This may include partial underlayment replacement and decking inspection. Section repairs make sense when one slope has failed but the rest of the roof is still in serviceable condition.
For comparison, the materials for a DIY repair (roofing cement, caulk gun) cost under $30. But if the DIY repair fails and water damage develops undetected, the resulting decking replacement and interior repair can run $2,000–$5,000. The calculus favors professional repair whenever there is any doubt about the scope of the problem.