
🚨 Safety First
- ⚠️ Never get on a wet roof — wait until conditions are safe
- ⚠️ Never tarp during active storms, lightning, or high winds
- ⚠️ Use a sturdy ladder with a spotter at all times
- ⚠️ If the roof pitch is steep (7/12 or greater), call a professional
- ✓ Document all damage with photos BEFORE covering it
Your roof has a hole, a section of missing shingles, or visible damage that is letting water into your home. It is pouring rain, or it is about to, and you need to stop the leak right now. This guide walks you through emergency roof tarping — how to do it safely, what materials you need, and when to call a professional instead.
Important: Emergency tarping is a temporary measure. It buys you time — days to weeks — while you file your insurance claim and arrange permanent repairs. A tarp is not a fix. It is a Band-Aid that prevents additional interior damage while the real solution is being planned.
When to DIY vs When to Call a Professional
Be honest with yourself about your comfort level on a roof. Here is when DIY tarping makes sense and when it does not:
DIY tarping is reasonable when:
- The roof pitch is low to moderate (under 7/12)
- The damaged area is accessible without walking across the entire roof
- Weather conditions are dry and calm
- You have experience working at height
- The damage is a small area (under 100 square feet)
Call a professional when:
- The roof is steep (7/12 or greater)
- The damage is extensive or structural
- It is actively raining, windy, or dark
- You do not have proper fall protection equipment
- The roof surface is wet, mossy, or debris-covered
At Talya Roofing, we offer same-day emergency tarping across Savannah, Pooler, Richmond Hill, and surrounding areas. If you are not comfortable getting on the roof yourself, call (912) 999-7989.
Materials You Need
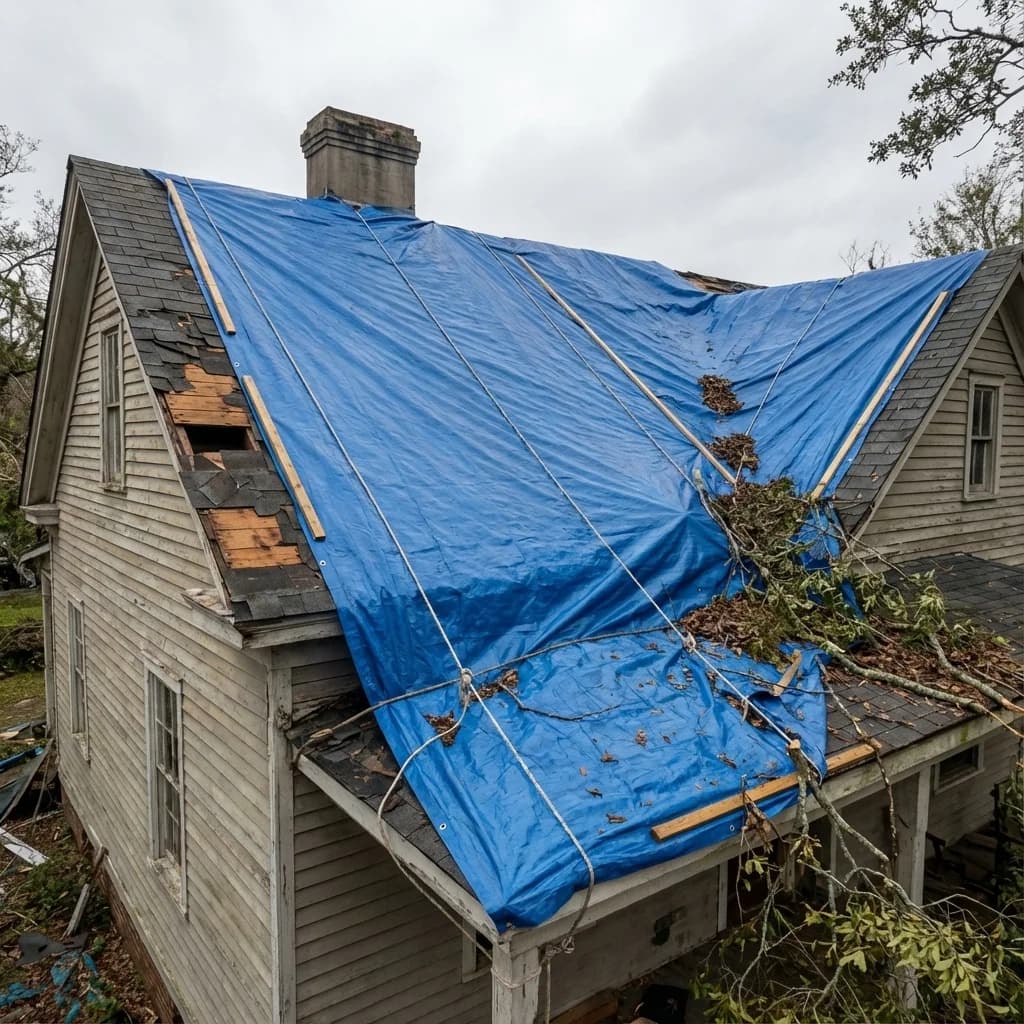
- Heavy-duty tarp: Use a blue polyethylene tarp at least 6 mil thick. Get one large enough to extend at least 4 feet past the damaged area on all sides, ideally wrapping over the ridge
- 2x4 lumber: Four to six 8-foot pieces for securing the tarp edges
- Screws: 3-inch wood screws (not nails — they pull out)
- Cordless drill: For driving screws through the 2x4s into the decking
- Rope or bungee cords: Backup for additional securing
- Ladder: Extension ladder that reaches at least 3 feet above the roof edge
Step-by-Step Emergency Tarping
- Document first: Take photos and video of the damage before you cover it. Your insurance company needs to see the actual damage, and once it is tarped, they cannot
- Clear debris: Remove any branches, loose shingles, or other debris from the damaged area and surrounding zone
- Position the tarp: Drape the tarp over the damaged area, extending it at least 4 feet past the damage in every direction. If possible, wrap the tarp over the ridge line so water cannot enter from the top edge
- Secure the top edge: Wrap the top edge of the tarp around a 2x4 and screw the 2x4 into the roof decking through the existing shingles. Place screws every 12 inches
- Secure the bottom and sides: Repeat with 2x4s along the bottom and side edges. The goal is to create a watertight seal that wind cannot lift
- Check tension: The tarp should be taut — sagging creates pockets where water pools and the weight eventually tears the tarp loose
Common Tarping Mistakes
- Using lightweight tarps: Thin, cheap tarps tear within days. Spend the extra $20 on a heavy-duty 6+ mil tarp
- Not extending past the ridge: Water runs downhill. If the tarp does not go past the ridge, water enters from the top
- Using nails instead of screws: Wind lifts the tarp and pulls nails out. Screws hold
- Forgetting to document before tarping: This can compromise your insurance claim
How Long Can a Tarp Stay On?
A properly installed tarp can protect your home for 30 to 90 days depending on weather conditions and tarp quality. UV exposure degrades polyethylene tarps quickly in Savannah's intense sun, so do not assume a tarp will last indefinitely. After a major storm event with long contractor backlogs, some homeowners have tarps on for several months — but these should be checked weekly and replaced when they show signs of degradation.
Need Emergency Tarping?
Same-day service. Professional installation. Keep your home dry while we plan permanent repairs.
Advanced Tarping Techniques for Savannah Storms
When tropical storms or hurricanes are forecast, having your tarping supplies ready and knowing the proper technique can mean the difference between thousands in additional water damage and keeping your home dry until professional repairs are possible.
Material Checklist
- Heavy-duty blue tarp (minimum 10 mil thickness, sized to extend 4 feet beyond damage on all sides)
- 2x4 lumber (8-foot lengths for weight distribution)
- Roofing screws (not nails — screws hold through wind vibration)
- Battery-powered drill with charged backup battery
- Safety harness and rope if roof access is required
- Work gloves and non-slip shoes
Ground-Level Tarping Method (Safest)
The safest approach — especially during active weather — is to deploy the tarp from the ground. Wrap one edge of the tarp around a 2x4, then throw or push the weighted edge over the ridge line from one side. Pull the tarp down over the damaged area from the other side. Secure the ground-level edges with additional 2x4 lumber or sandbags. This method avoids roof access entirely, reducing fall risk during wet conditions.
Common Tarping Mistakes to Avoid
Even with the right supplies and technique, several common mistakes can make emergency tarping ineffective or create additional problems:
- Tarp too small: The tarp must extend at least 4 feet beyond the damaged area on all sides — water runs upslope during wind-driven rain
- Nailing through the tarp into the deck: This creates new penetration points. Use lumber weight on top of the tarp, or screw furring strips through the tarp into existing fastener lines only
- Not extending over the ridge: If the damage is near the ridge, the tarp must go over it — water from the opposite slope will run under a tarp that stops short of the peak
- Leaving tarp for months: UV exposure degrades standard blue tarps within 30-60 days. If permanent repair is delayed, replace the tarp monthly or upgrade to a UV-rated silver tarp