
Key Takeaways
- Flashing leaks at pipe boots and wall transitions are the most common roof leak type in Savannah homes
- A temporary DIY seal using roofing cement or silicone caulk can buy time until a professional repair is scheduled
- Roof work is inherently dangerous — never attempt it in wet, windy, or hot conditions
- DIY sealing is a temporary fix, not a permanent solution — deteriorated flashing needs professional replacement
- Knowing when to call a professional prevents small leaks from becoming major water damage events
It's raining, water is dripping through your ceiling, and you can't get a roofer out until next week. Savannah homeowners face this scenario regularly — especially during summer thunderstorm season when every roofing company in town is fielding emergency calls. If you can identify a flashing leak and conditions are safe, a temporary DIY seal can protect your home until professional help arrives. But this guide comes with important caveats about safety, limitations, and knowing when to stay off the roof entirely.
Safety First — Non-Negotiable Rules
Before discussing any DIY roof work, understand the risks. Falls from residential roofs cause thousands of serious injuries and hundreds of deaths every year in the United States. Savannah's climate adds additional hazards that make roof work particularly dangerous for untrained homeowners.
- NEVER go on the roof when it's wet. Wet shingles are extremely slippery, and moss or algae growth common on Savannah roofs makes the surface even more treacherous. Wait for completely dry conditions
- NEVER work on the roof in temperatures above 90°F. Heat exhaustion can cause dizziness and impaired judgment at height. In Savannah's summer, this means early morning or late afternoon only
- NEVER work on the roof during wind. Even moderate gusts can destabilize you on a sloped surface. If wind speeds exceed 15 mph, stay on the ground
- NEVER work alone. Always have someone on the ground who can see you and call for help if needed
- Use a sturdy extension ladder properly footed on level ground, extending at least 3 feet above the eave line. Maintain three points of contact at all times
- Wear shoes with soft rubber soles that grip shingle surfaces. Never wear sandals, boots with hard soles, or dress shoes on a roof
If you're not comfortable with heights, don't have the right equipment, or the roof pitch is steep (8:12 or greater), do NOT attempt this. Call a professional roof repair service and manage the leak from inside until they arrive.
Identifying the Leak Source
From the Attic
Before going on the roof, check the attic during or immediately after rainfall. Bring a flashlight and look for water entry points on the underside of the deck. Water often travels along rafters and sheathing before dripping, so trace the moisture trail uphill to find the actual entry point. Mark it with chalk or tape from the attic side so you can locate the corresponding spot on the roof exterior.
Common Flashing Failure Points
The vast majority of flashing leaks in Savannah homes occur at predictable locations:
- Pipe boot seals: The rubber collar around plumbing vent pipes cracks and separates from UV exposure, allowing water to run down the pipe into the house
- Wall-to-roof transitions: Step flashing at dormers and sidewalls lifts, corrodes, or loses its sealant, creating a gap for water entry
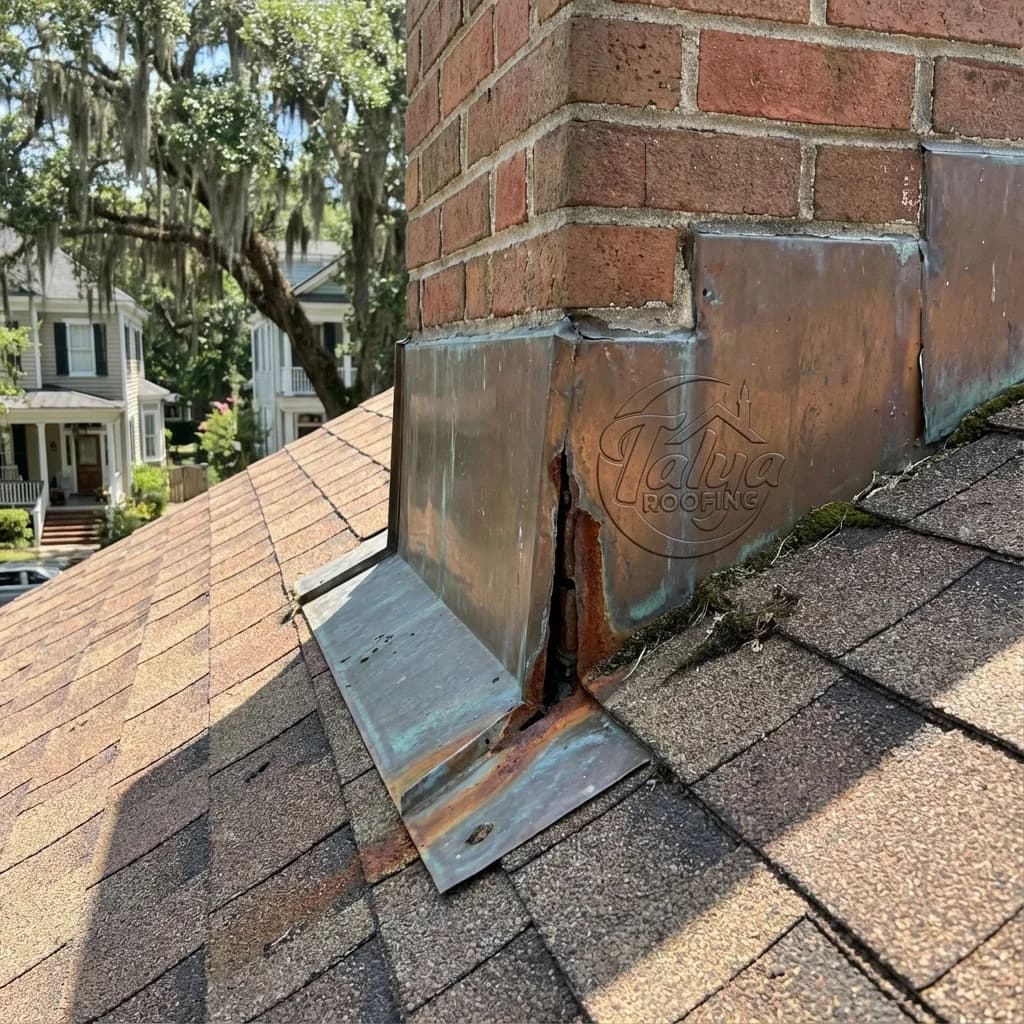
- Chimney flashing: Counter flashing separates from mortar joints, and the sealant at the cricket or saddle behind the chimney deteriorates
- Valley transitions: Where two roof planes meet, improper overlap or damaged valley flashing allows water to breach during heavy flow
Temporary Sealing: Materials and Method
What You'll Need
- Roofing cement (plastic roof cement, also called roof tar) in a caulk tube or small tub
- Exterior-grade silicone sealant as an alternative for smaller gaps
- A caulking gun
- A putty knife or disposable plastic spreader
- A wire brush or stiff bristle brush for surface cleaning
- Rags for cleanup
Sealing a Pipe Boot Leak
This is the most common DIY-accessible flashing repair. Clean the area around the pipe boot base with a wire brush, removing loose granules, dirt, and old sealant. Ensure the surface is completely dry. Apply a generous bead of roofing cement around the entire base where the boot meets the shingle surface, pressing it into the gap between the rubber collar and the pipe. Build the sealant up slightly above the surrounding surface so water flows over the seal rather than pooling against it. Apply a second bead around the top of the rubber collar where it meets the pipe.
Sealing a Step Flashing Gap
Where step flashing has lifted away from the wall or lost its sealant, clean the joint thoroughly and apply roofing cement into the gap. Press the flashing back into position if it has lifted, and apply additional sealant over the top edge. If the flashing itself is corroded through or broken, a temporary patch with roofing cement over the area can slow water entry, but professional replacement is needed promptly.
When DIY Sealing Won't Work
Recognize the limitations of temporary sealing. These situations require professional roof repair — attempting a DIY fix will likely cause additional damage:
- Multiple leaks across the roof: Indicates systemic failure requiring evaluation and likely replacement
- Damaged or missing shingles: Requires proper shingle replacement, not just sealant
- Structural sagging or soft spots: Indicates deck or framing damage that's beyond surface repair
- Valley leaks: Complex geometry that requires professional flashing work
- Chimney flashing failures: Involves masonry work and counter flashing that needs trade expertise
Managing the Leak From Inside
If conditions prevent safe roof access, manage the leak from inside to minimize damage. Place buckets or containers under active drips. If water is pooling behind the ceiling surface (causing a bubble or sag), carefully puncture the center of the bulge with a small nail to release the water in a controlled manner — letting it accumulate risks a sudden ceiling collapse. Move furniture, electronics, and valuables away from the affected area. Lay plastic sheeting on the floor to protect carpet or hardwood.
Then call a professional. A trusted roof inspection after the weather clears will identify the true scope of the problem and the right permanent solution.
Need Professional Leak Repair?
Talya Roofing responds quickly to leak emergencies across Savannah, Pooler, Richmond Hill, and Tybee Island. Temporary DIY seals buy time — we provide the permanent fix.